Add WhatsApp to Your WordPress Site With Multiple Agents, Business Hours, and Analytics – If you run a WordPress site and you’re still copying your WhatsApp number into a plain text link and calling it a “contact button,” this post is for you.
Not in a condescending way.
In a “we need to have a talk” kind of way.
OneClick WP Hello is a free WordPress plugin that turns your WhatsApp presence on your site into something that actually works.
We’re talking floating buttons, multiple agents with an agent-selection popup, business hours scheduling, a share button, click analytics, and a chat teaser bubble that can be triggered by scroll depth.
All from one plugin. All free. All without writing a single line of code.
It just launched its 1.0.0 version in May 2026, but the plugin has been around since 2019.
This is a full rewrite, and the feature list reflects that.
Let’s get into it.
What Is OneClick WP Hello?
OneClick WP Hello is a WhatsApp contact and sharing plugin for WordPress.
You install it, enter your WhatsApp number, and you get a fully customizable contact button you can place anywhere on your site using a shortcode, plus a floating button that shows up across your entire site.
The plugin stores all settings in a single WordPress options row.
No extra database tables, no bloated setup, no drama.
It works with WordPress 6.2 and above, requires PHP 7.4 or higher, and has been tested up to WordPress 7+ and PHP 8.4.
In short, it’s built to be lightweight and practical without stripping out the features that actually matter.
The Shortcode Contact Button
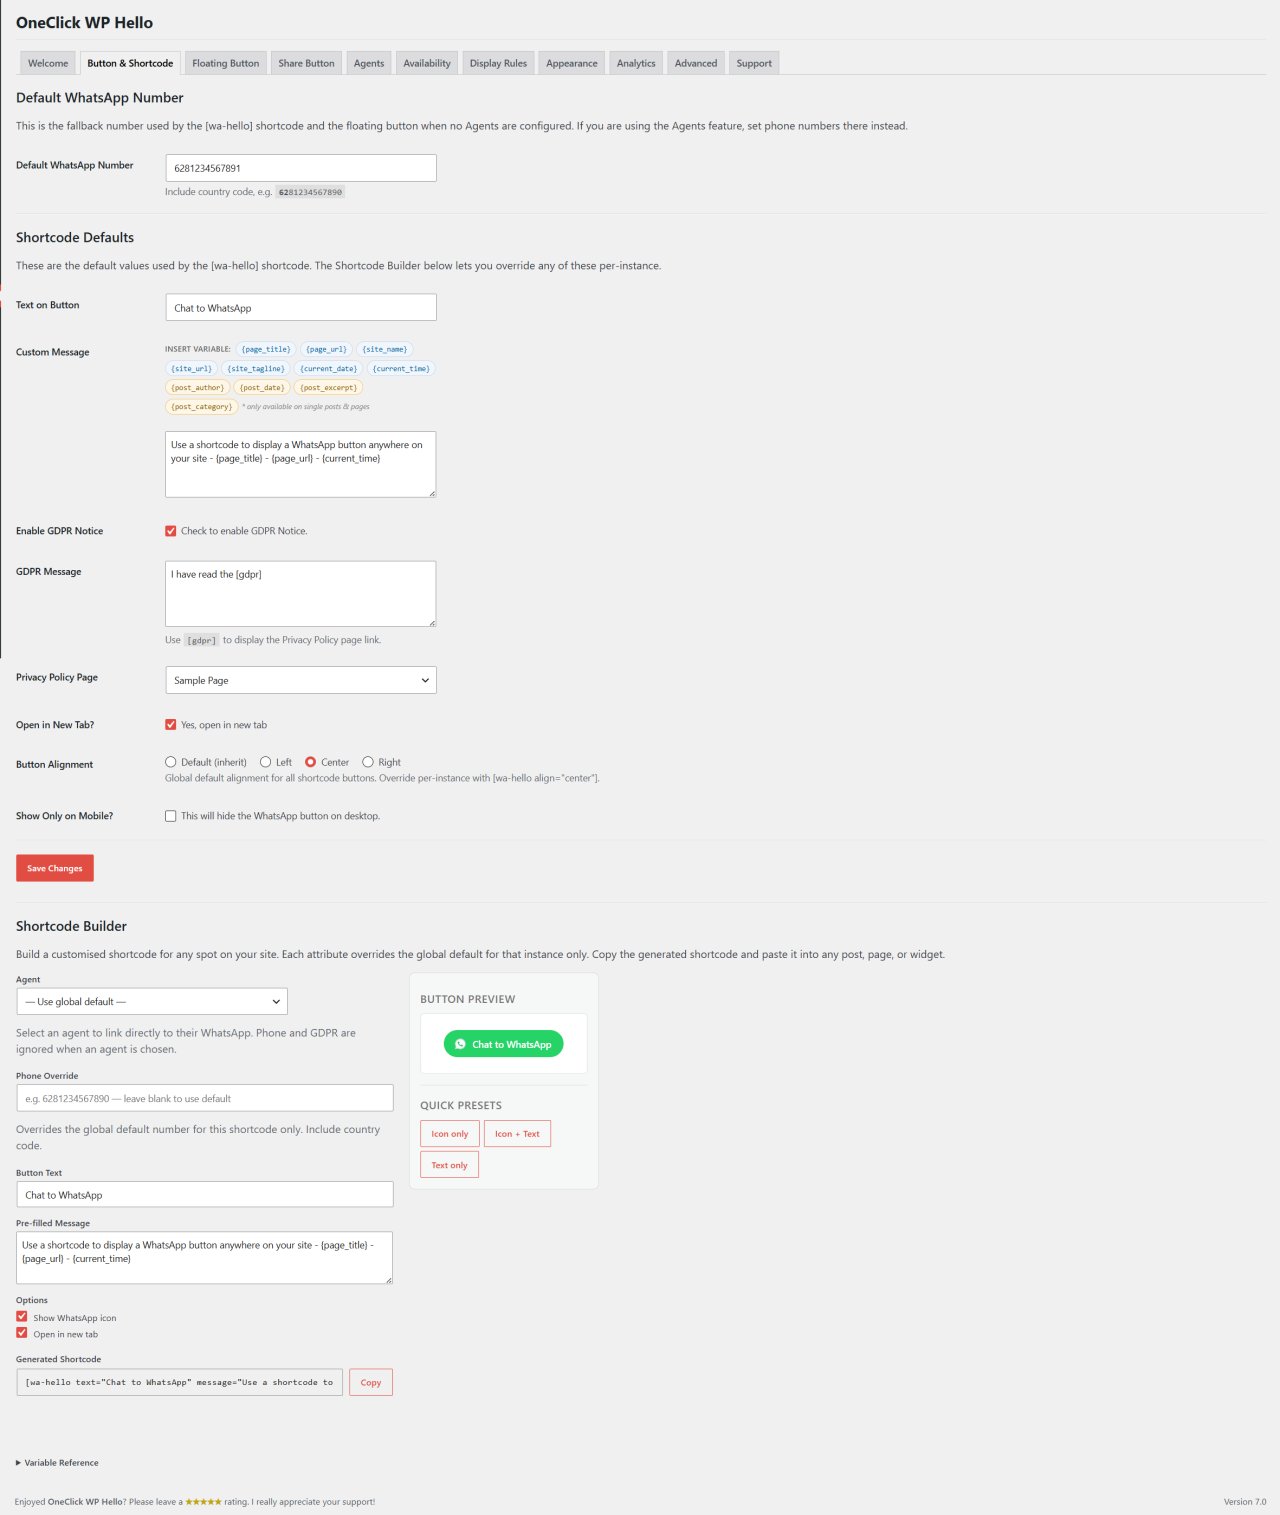
The most basic use of this plugin is placing a WhatsApp button in your content.
You do that with the [wa-hello] shortcode.
Drop it into any post, page, or widget area, and a WhatsApp contact button appears.
What makes it more than just a button is the per-instance override system.
Every time you use the shortcode, you can customize it without touching the global settings.
Shortcode Attributes You Can Override
The [wa-hello] shortcode accepts five attributes:
- phone – Set a different WhatsApp number for this specific button
- text – Change the button label
- message – Set a pre-filled message that opens in WhatsApp when the button is clicked
- align – Position the button left, center, or right
- agent – Force a specific agent by ID (more on agents later)
So you can have [wa-hello phone="6281234567890" text="Chat Now" message="Hi, I saw your pricing page" align="center"] on one page, and a completely different button configuration on another page, all using the same shortcode system.
Dynamic Message Variables
The pre-filled message system supports 11 dynamic tokens that are resolved client-side at the moment of click.
That means the message is always current, always accurate, and you don’t have to manually update anything.
The available tokens are {page_title}, {page_url}, {site_name}, {site_url}, {site_tagline}, {current_date}, {current_time}, {post_author}, {post_date}, {post_excerpt}, and {post_category}.
So a message like “Hi, I’m on {page_title} and have a question” becomes “Hi, I’m on [Your Actual Page Title] and have a question” by the time the visitor clicks.
It’s a small thing that makes conversations feel less robotic.
The Floating Button
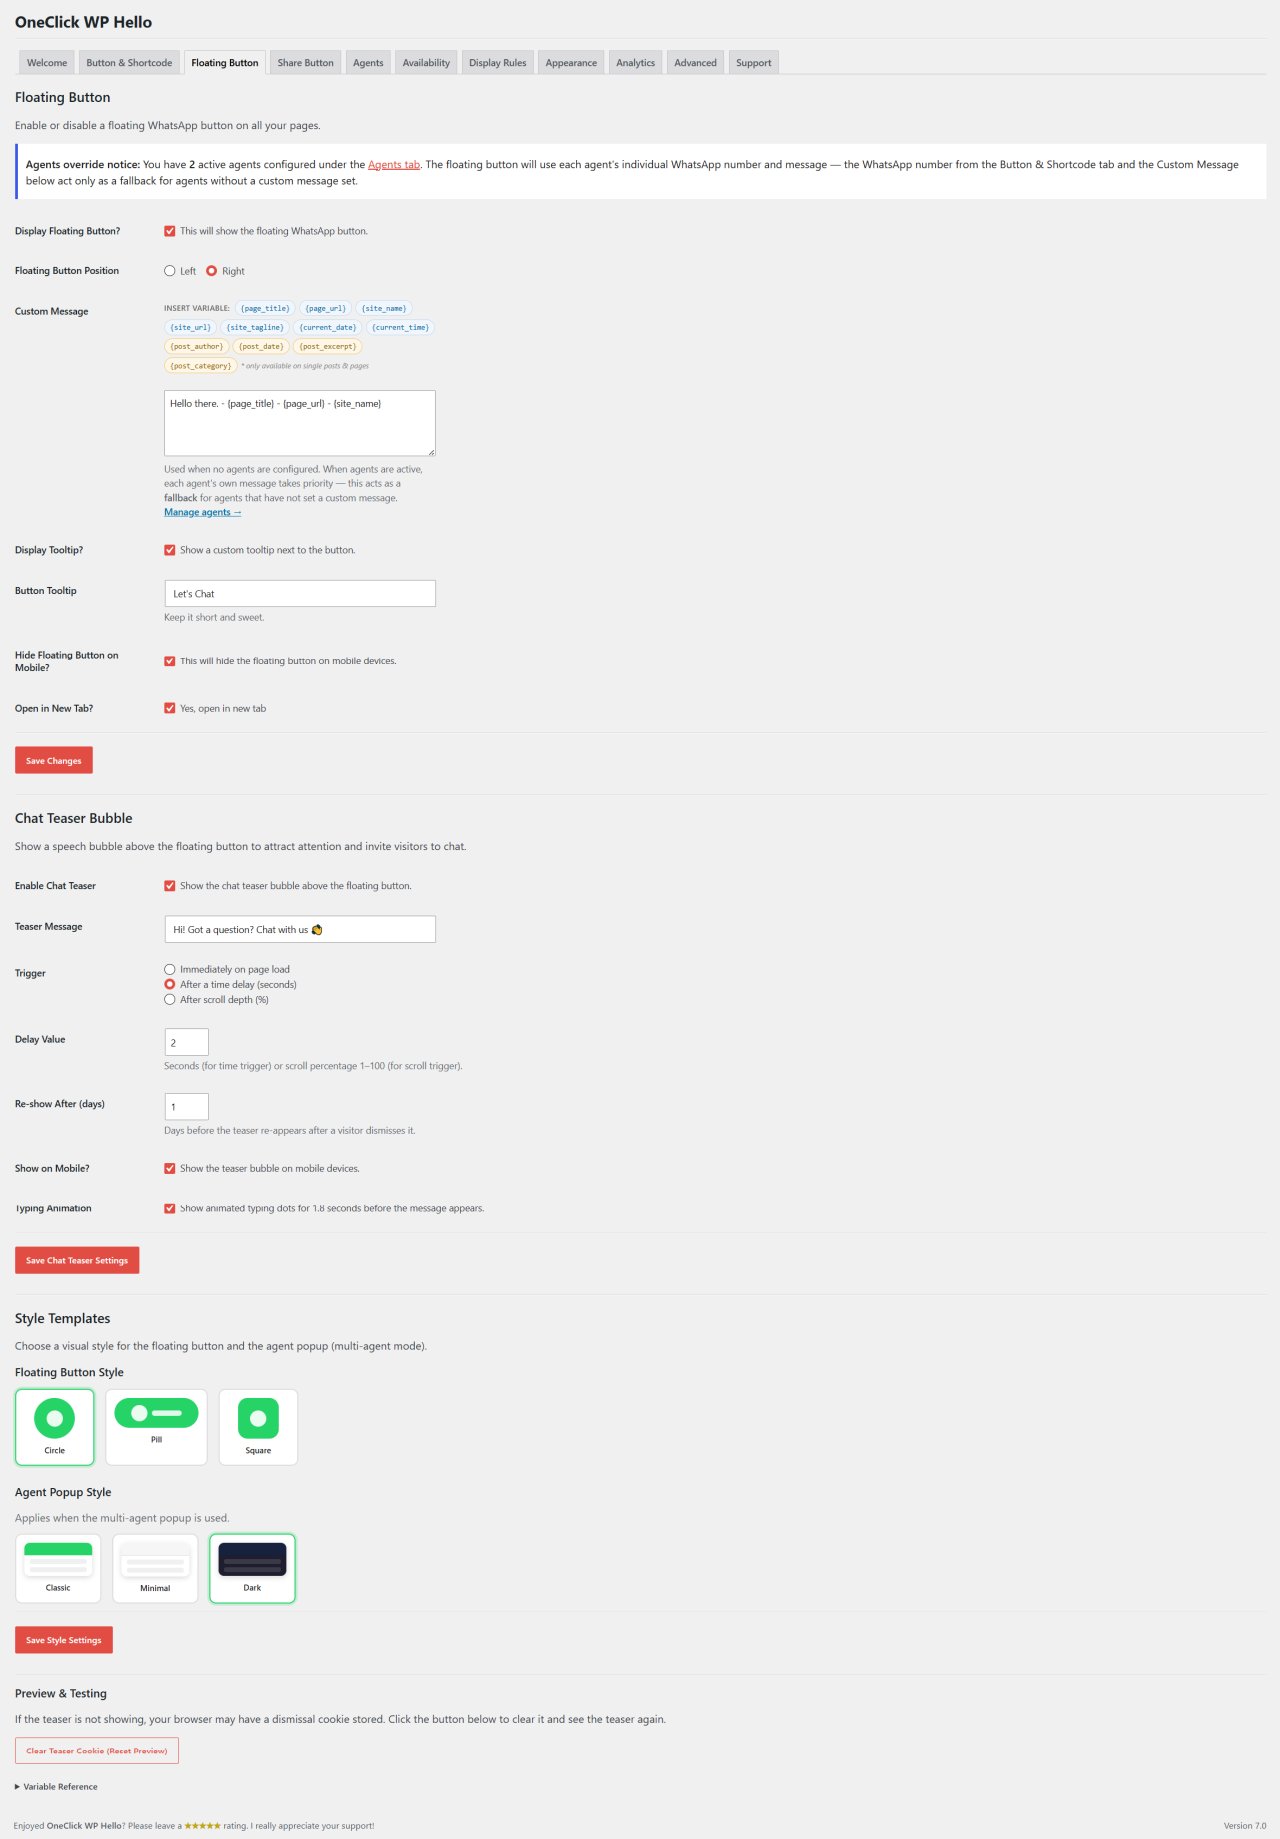
The floating button is fixed to a corner of the screen and displays site-wide, so visitors can reach you from any page without you needing to place a shortcode on every single one.
You can position it on the left or right side of the screen, choose from three styles (Circle, Pill, or Square), add an optional tooltip with hover animation, and configure whether it shows on mobile at all.
The Pill style includes an icon plus label text, which tends to get higher click rates than a bare icon because people actually know what they’re clicking.
Floating Button Appearance Controls
The floating button has its own independent set of appearance controls separate from the shortcode button.
You can set background color, text and icon color, hover color, button size (Small, Medium, or Large), border radius (Pill, Rounded, or Square), and whether to show a drop shadow.
There’s also a pulse animation option with three states: Off, Always, or Timed with a configurable interval.
The Timed option is useful if you want to draw attention to the button periodically without it pulsing every single second, which gets annoying fast.
Multiple Agents and the Agent Popup
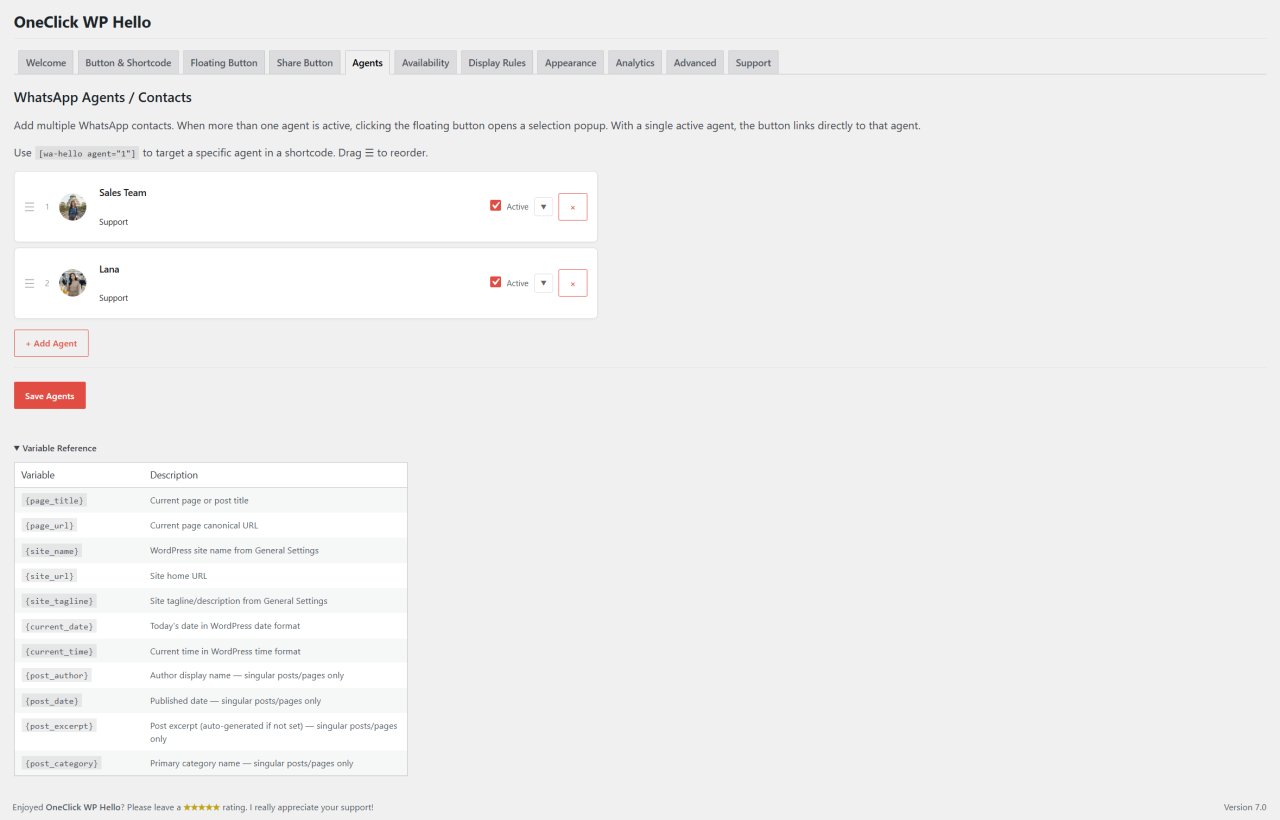
This is where the plugin gets genuinely useful for businesses with a team.
You can add unlimited agents, each with their own name, role, WhatsApp number, pre-filled message, and avatar image.
When you have two or more agents active, the plugin automatically shows an agent-selection popup instead of routing visitors directly to a single number.
One active agent means a direct link, no popup.
The system figures this out automatically.
Agent Popup Styles
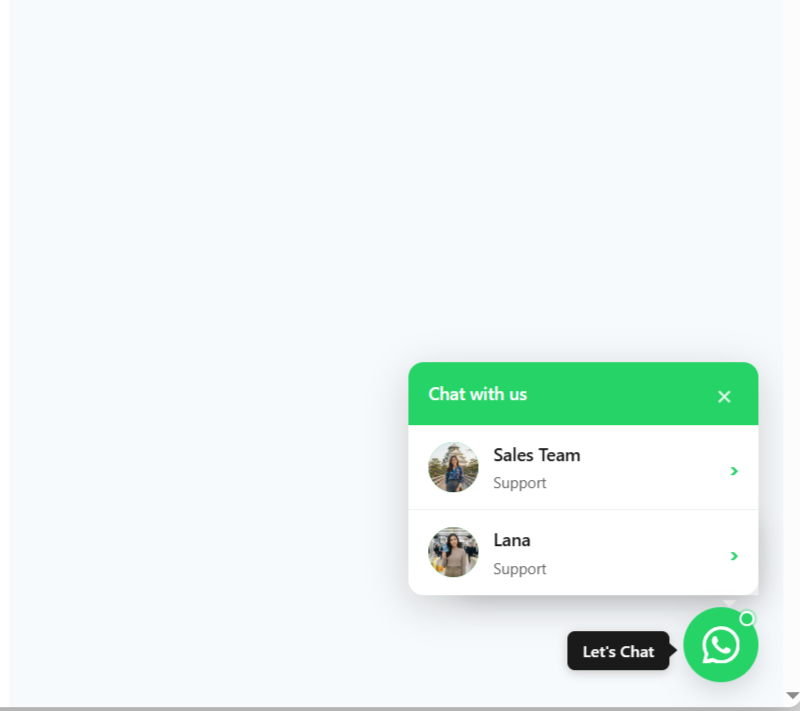
The popup comes in three visual styles: Classic, Minimal, and Dark.
The Classic style is a standard card layout.
Minimal strips it down to just the essentials.
Dark uses a dark background, which tends to work better on sites with dark themes or if you just want it to look less like a generic widget.
Per-Agent Shift Scheduling
Each agent can have their own shift schedule, separate from the global business hours.
You set which days they work and their open and close times.
This works independently alongside the global schedule, so you can have some agents available 24/7 while others only show up during business hours.
This is more useful than it sounds.
If you have a sales team in different time zones, or agents who only handle certain days, you can route visitors to whoever is actually available right now instead of having them click on someone who won’t respond for eight hours.
The WhatsApp Share Button
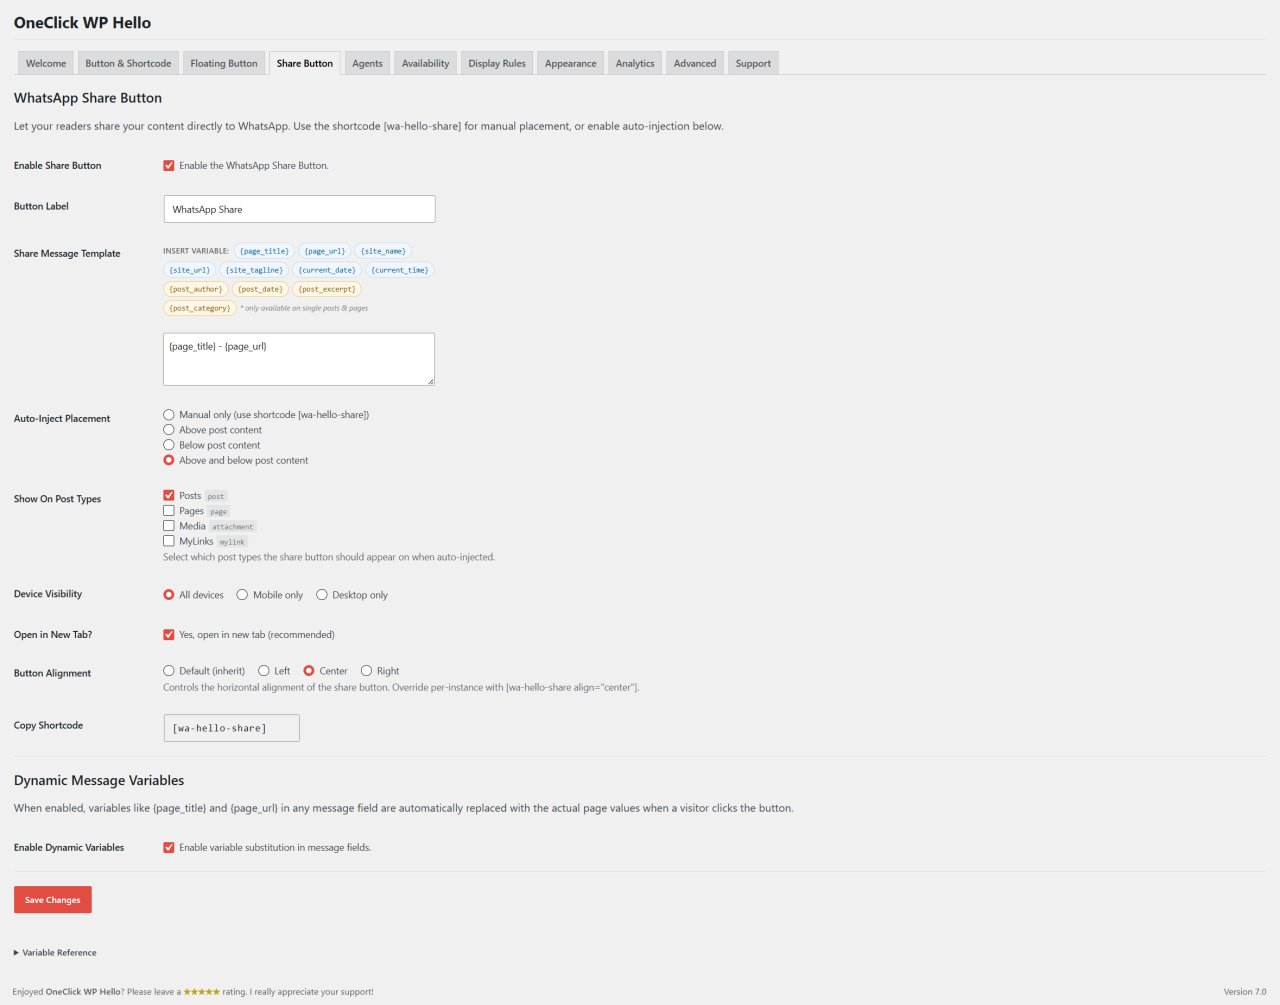
Beyond the contact functionality, OneClick WP Hello includes a share button system that lets visitors share your content directly to WhatsApp.
The shortcode is [wa-hello-share], and it supports its own set of per-instance overrides for button text and alignment.
You can also configure the share button to auto-inject above your content, below your content, or both, which means you don’t have to manually add the shortcode to every post.
The auto-inject option handles it site-wide based on your settings.
Share Button Device Visibility
The share button has three device visibility options: All, Mobile only, or Desktop only.
Sharing content to WhatsApp is primarily a mobile behavior, so the Mobile only option makes sense in most cases.
The customizable share message template also supports dynamic variable tokens, so the share message can include the post title, URL, or whatever else you want to include.
A Gutenberg block is included for the share button, so if you’re building posts in the block editor and want more control over placement, you don’t have to use the shortcode.
Business Hours and Availability
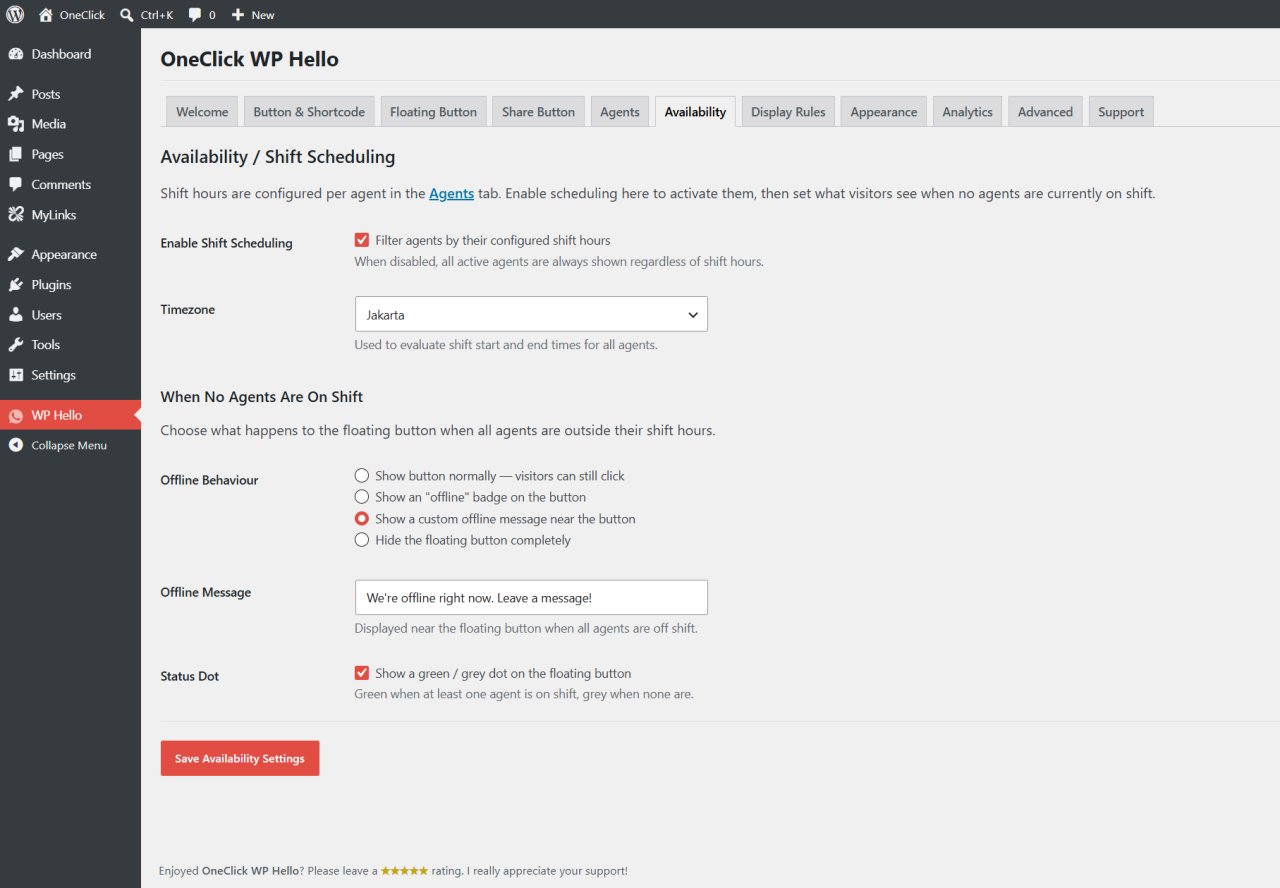
The plugin has a global weekly schedule where you set which days you’re open, plus your open and close times with a full timezone selector.
When you’re offline, you can choose what happens: show the button normally, hide it completely, show a status badge indicating you’re offline, or display a custom offline message.
The floating button also shows an online or offline status dot that updates based on your schedule.
It’s a small visual indicator, but it sets expectations for visitors who might be about to send a message at 2am on a Sunday.
Display Rules
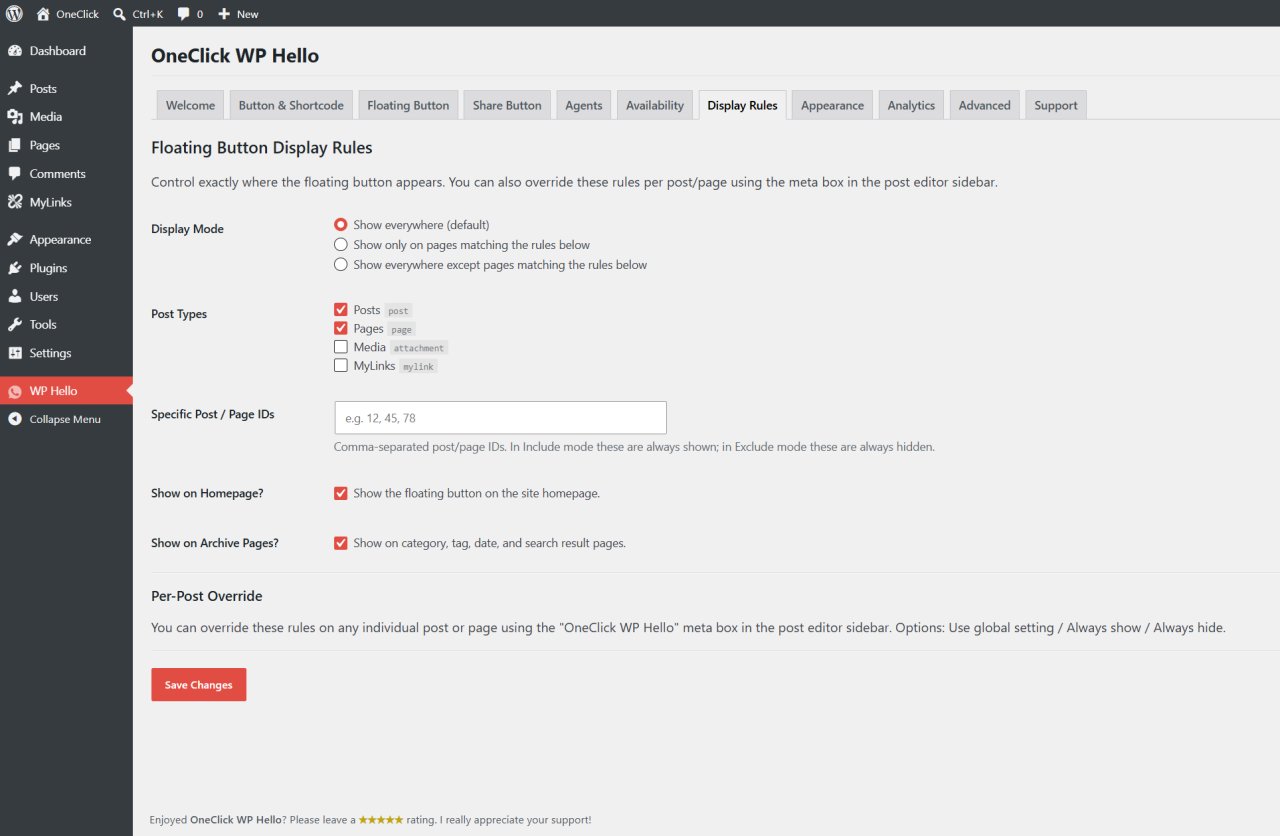
OneClick WP Hello gives you granular control over where buttons appear.
The options are: show everywhere, show on an include list, or show on an exclude list.
You can filter by post type using checkboxes, target specific post and page IDs, and toggle display for the homepage and archive pages separately.
If you need even more control, there’s a per-post and per-page meta box that lets you force show or force hide the button on any individual piece of content, regardless of global settings.
This matters because you probably don’t want the contact button showing up on your thank-you page after a purchase, or on your 404 page, or in places where it creates friction instead of reducing it.
The Chat Teaser Bubble
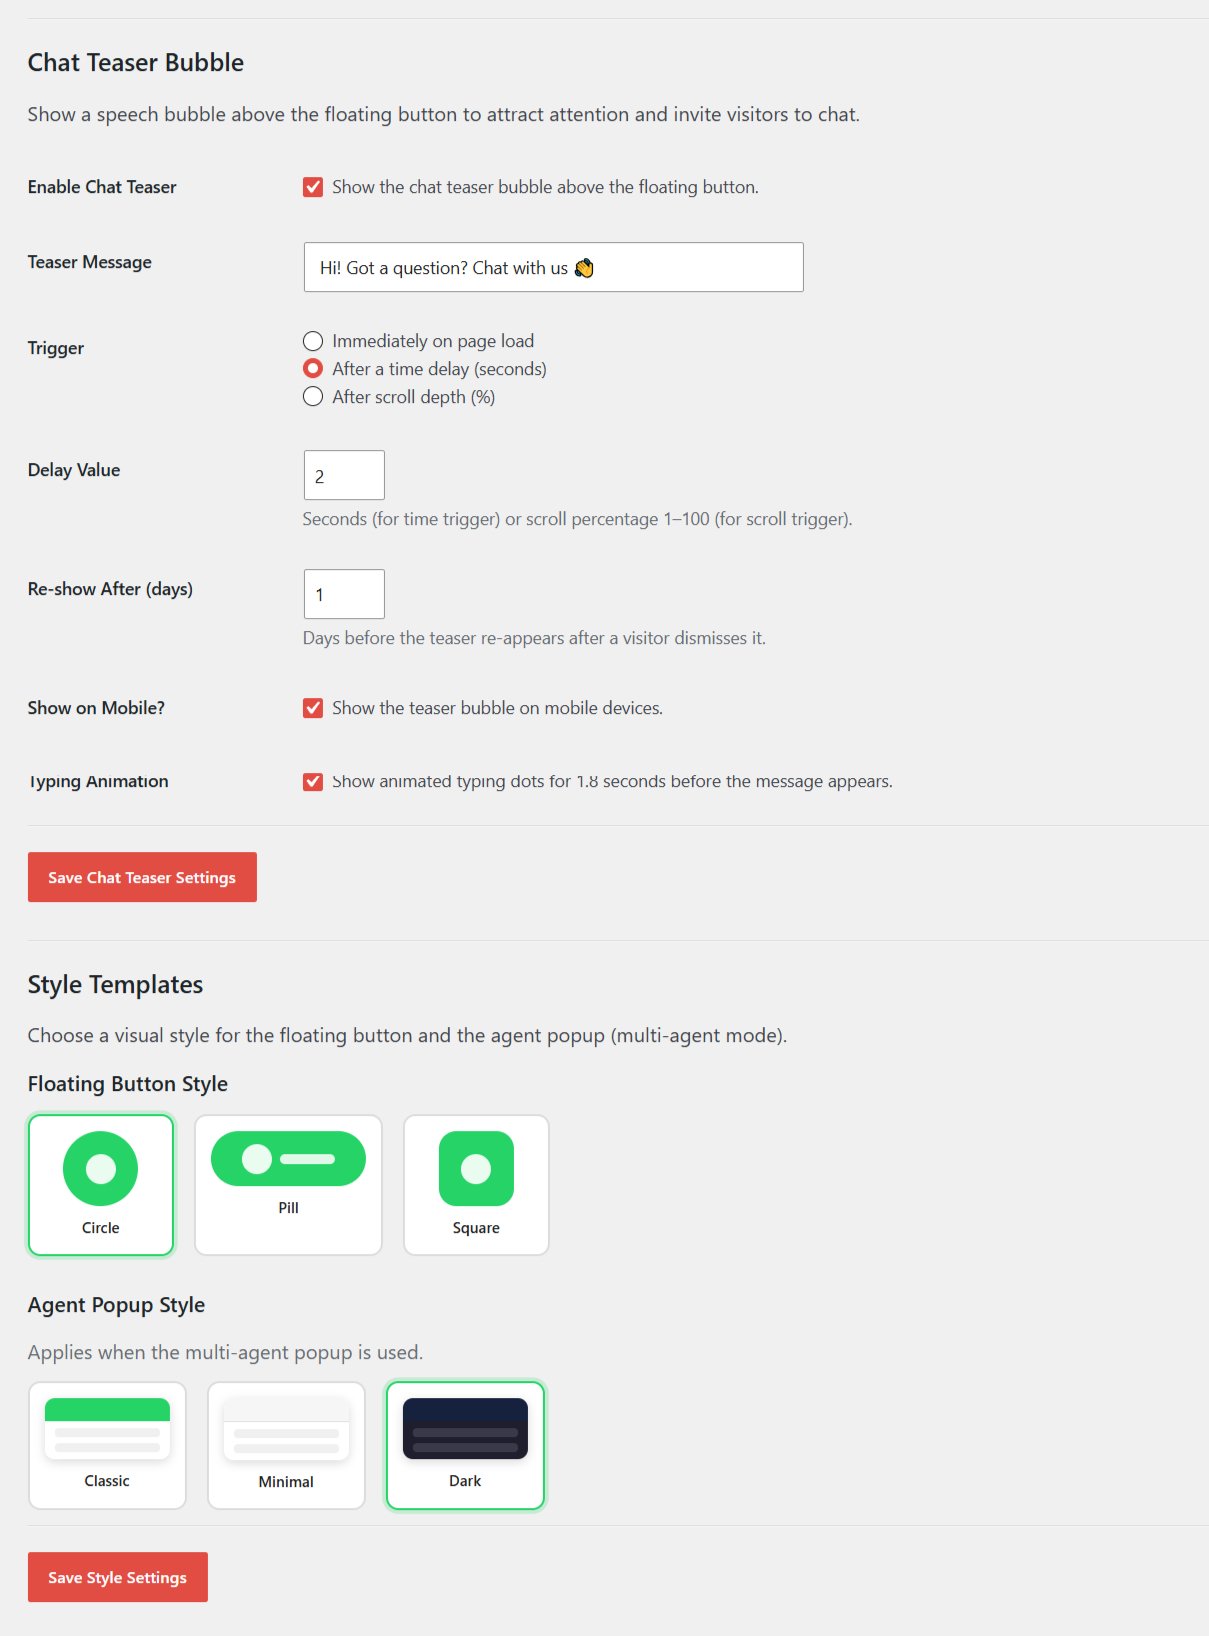
The chat teaser is a speech bubble that appears above the floating button to prompt visitors to start a conversation.
It supports three trigger options: Immediate (shows right when the page loads), Time delay (shows after a set number of seconds), and Scroll depth (shows after the visitor scrolls a certain percentage of the page).
There’s a typing animation with a three-dot indicator that makes it look like someone is about to send a message.
It’s a small touch, but it draws the eye in a way that a static bubble doesn’t.
The bubble uses cookie-based auto-dismissal with a configurable re-show period, so once a visitor closes it, it doesn’t keep popping up every page load.
You also control whether it shows on mobile at all, since small screens and chat bubbles can get crowded fast.
Click Analytics
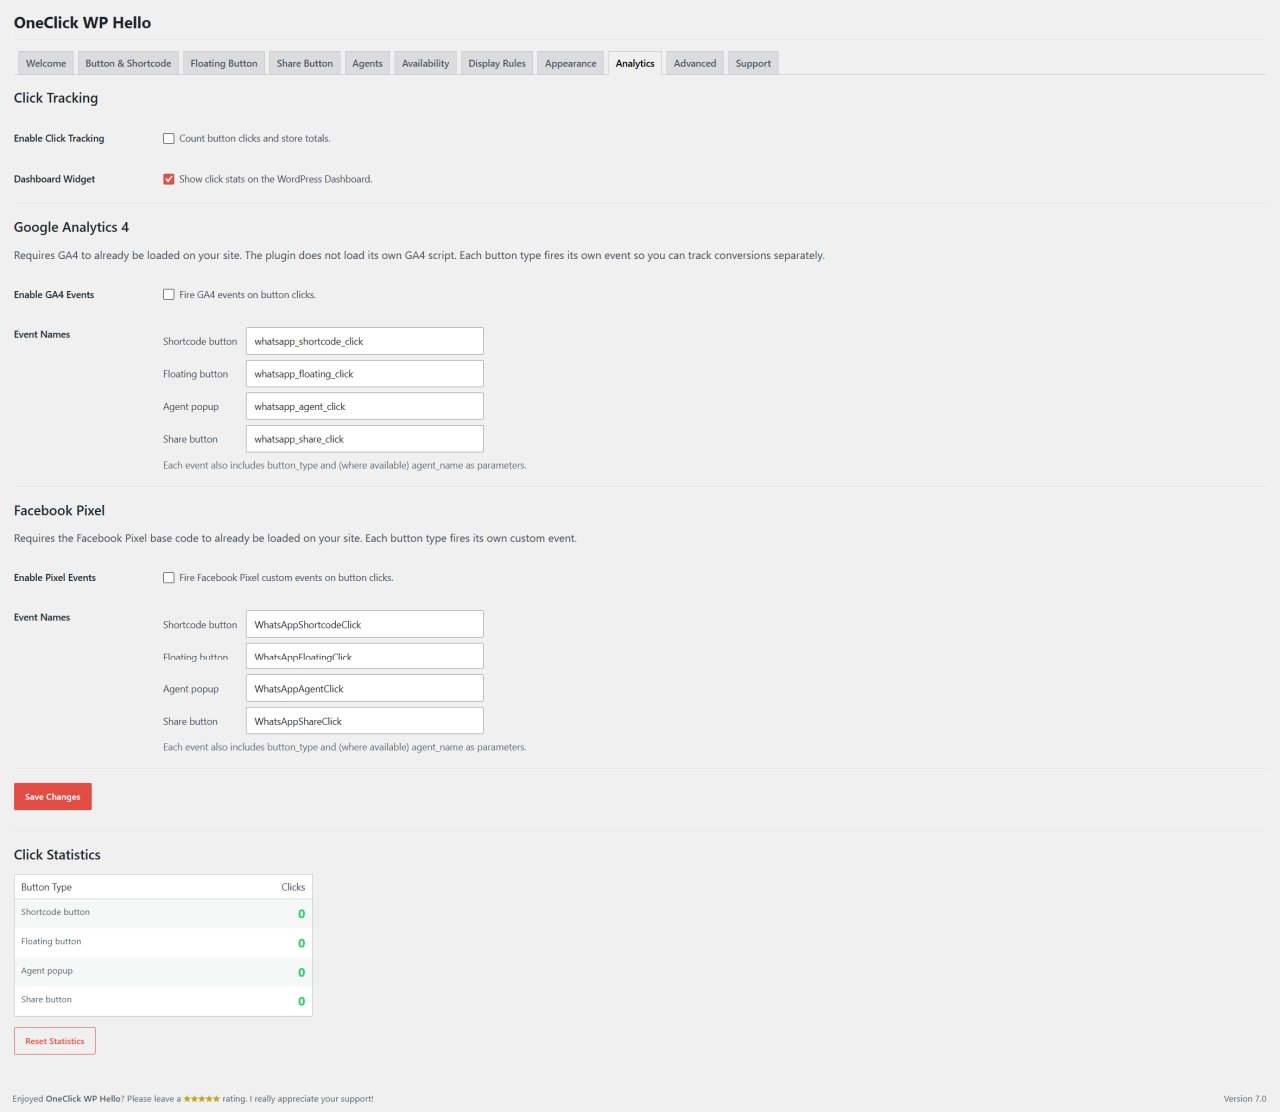
The plugin tracks clicks per button type: shortcode button, floating button, agent popup, and share button.
For agent popups, you also get a per-agent click breakdown, so you can see which team member is getting the most contact attempts.
There’s a WordPress Dashboard widget that displays your stats without making you dig through settings menus to find the numbers.
Third-Party Analytics Integration
If you’re already tracking events in Google Analytics 4 or Facebook Pixel, you can connect those too.
The plugin supports gtag event integration for GA4 and fbq event integration for Facebook Pixel.
Event names per button type are configurable, so your GA4 dashboard can use whatever naming convention you’ve already established.
There’s also a stats reset option, which is useful if you want to start fresh after a major site change or promotional campaign.
Import, Export, and Reset
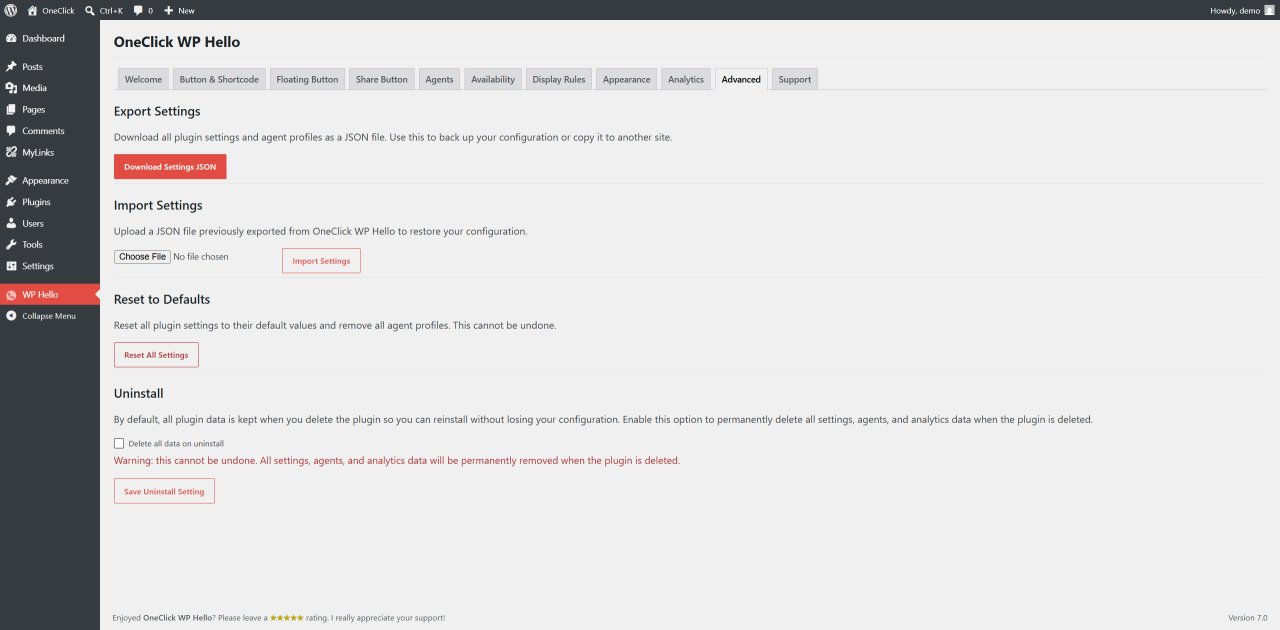
The plugin includes a full settings import and export system using JSON.
You can export all settings and agent profiles, import them on another site, and reset everything back to plugin defaults.
The import uses an allowlist of known keys, so you can’t accidentally break things by importing a malformed JSON file.
This is handy for agency workflows, staging-to-production transfers, or just backing up your configuration before making major changes.
How to Get Started in Five Minutes
Installing and setting up OneClick WP Hello is straightforward.
Here’s the short version.
- Step 1: In your WordPress dashboard, go to Plugins, then Add New. Search for “OneClick WP Hello,” click Install Now, then Activate.
- Step 2: A new “WP Hello” item appears in your left admin menu. Click it.
- Step 3: On the Button and Shortcode tab, enter your WhatsApp number with country code (digits only, for example
6281234567890). - Step 4: Place
[wa-hello]in any post, page, or widget where you want the contact button to appear. - Step 5: If you want the site-wide floating button, go to the Floating Button tab and check the “Display Floating Button” option.
That’s it.
You can spend another hour customizing colors, adding agents, setting up business hours, and configuring the teaser bubble, but the basic setup takes about five minutes.
Who This Plugin Is For
OneClick WP Hello is built for anyone running a WordPress site who wants WhatsApp contact functionality that goes beyond a plain hyperlink.
That includes freelancers who want clients to be able to reach them directly, small businesses with a support or sales team, bloggers who want to add a share button to improve content distribution, and service businesses that operate on specific hours and want their contact button to reflect that.
The multi-agent feature specifically makes it worth installing for any business with more than one person handling customer contact.
Also read:
Routing every visitor to a single number that may or may not be monitored right now is a conversion problem that this plugin solves without any complicated setup.
Final Thoughts
OneClick WP Hello covers a lot of ground for a free plugin.
The floating button, shortcode system, multiple agents with shift scheduling, business hours, display rules, share button, analytics, and teaser bubble are all features you’d typically find spread across two or three separate plugins, if you find them free at all.
The 1.0.0 rewrite cleaned up the codebase, added the Gutenberg block, expanded the agent system, and introduced the full analytics suite.
It’s available on WordPress.org right now, requires no external libraries, and won’t add database tables to your installation.
If your current WhatsApp contact setup is a link that says “Click here to chat,” you already know what to do next.