This is the Second Part of Building a Good Travel Blog, please read the previous post here.
Having you here, I assume that you're already interested in building a travel blog with WordPress (WordPress.org not WordPress.com), especially after checking the previous postabout this topic.
Well, there are tons of reasons why people keep recommending us to choosing WordPress as main blogging platform.
The reasons are pretty reasonable though, and that's why I, too, recommend you to choose WordPress.
I also have already explained several reasons to choose WordPress as your main blogging platform.
And while you notice why some bloggers tend to use Blogspot or Tumblr as their blogging platforms (especially in Indonesia), there are possibilities that they tend to be jealous to WordPress users.
It's important to brief you some more good reasons on why use WordPress as your main blogging platform:
- Advance customizations, easy to set up.
- Unlimited resources to help you enhance the feels of your WordPress blog.
- WordPress is easy to learn, no need to worry about that.
- Massive supports from good people will stay at your back anytime, in case you need some helps.
- There are tons of FREE WordPress stuffs out there whether it's plugin, theme, custom codes, and other resources.
- Much more! You'd be tired to count them all.
Moving to the next section, it's probably simple for you to build a travel blog 'cause maybe you already have the concepts and the stories to tell.
So now, you probably need something to host them all so then people out there can reach your travel stories.
The best form to host them all, of course, a blog! Facebook, Instagram, etc will never enough. I assume that you agree with me, that's why you arrived in here, eh?
Before expanding to the comprehensive guides, here's the list of what we're gonna discuss:
- Choose your hosting and domain name.
- Choose the WordPress theme and plugins you're gonna use. Read every detail to understand the features and functions of each theme and plugins.
- Outline the concepts of what you're gonna fill your blog with.
- Download and install WordPress into your hosting and integrate it with your domain name. It sounds difficult but don't worry just yet because most of hosting providers this day have 1-click WordPress installation feature, right from the hosting's cPanel itself. It means you can install and start using WordPress as main blogging platform on the go with that 1-click feature.
Now then, you already have a simple list to start blogging with your travel blog using WordPress. Alright, let's move to cover them all.
WordPress As Main Blogging Platform: The Comprehensive Guides


Right! I'd tried to make this post as short as possible so reading this wouldn't waste your precious time. If you need some help 'cause there's maybe incomplete or difficult steps to follow, you can reach me later for help. Nah, let's start discussing the guides.
1. Choose your hosting and domain name: What is which? Where to Purchase?
If we talk about a place, say my Granny's house; Djamin Ginting Street is the domain name (address), the modest yet beautiful building is the hosting (house itself), and the warm sofa is one of the contents.
Like warm sofa, we need to host them into something, in this case my Granny's house, and my Granny's house has an address so it'd be easy for anyone to locate.
That's similar to a blog or website.
You need a hosting to host your writings or travel stories/articles and then you need domain name as the address so people can easily reach you on the web.
Now the most difficult part, how to choose the best hosting and domain provider among the available ones?
Hint:First, choose your domain name, wisely!
What extension you're gonna use? Is it .com, .org, .net, .info, .me, or specific region extension like .com.au (Australia)?
Make sure that the domain name you're gonna choose is related with the topic you're gonna fill your blog with.
If you decided to fill your future WordPress blog with traveling-related topic, then choose your domain name with traveling-related keywords inside it as well. You can also use your name, it's up to you though.
About the domain extension, please note that every extension has its own price and terms. Choose it wisely.
Hosting & Domain
Nowadays, most hosting providers offer great deals to their hosting service like free domain name for every specific purchase.
If, for example, you purchase their specific hosting package, you're gonna get the included domain name with no additional cost.
Your chosen domain name will be automatically integrated with the hosting as well, so all you need next is to install WordPress and set it up.
Where to Purchase?
There are many great hosting and domain providers out there, some of which are Namecheapfor domain name and Bluehostfor international hosting users, also Niaga Hoster(use coupon code to get discount for every purchase: a-SB2015and/or a-seniberpikir) for my Indonesian folks.
I love Namecheap because it gives vary and affordable domain names to choose. I have six blogs, four of them are using domain names from Namecheap.
For hosting, both Bluehost and Niaga Hoster include free domain when you purchase one of their hosting packages.
Both of them come with affordable price for each hosting plan and support 1-click WordPress installation.
Free Options
If you prefer the free options for both hosting and domain name, you can use free domain extensions such as .tk, .ml, .ga etc on Freenom.
For hosting, there is my ultimate choice: Idhostinger. Both services also come with premium hosting plans and domain names. The price? Extraordinary cheap!
2. The Basic WordPress Tools: Theme and Plugins
Well, there are two basic but must-have tools for your basic WordPress configurations: theme and plugins.
Theme for design and plugins to expand the WordPress functions. You're gonna need the two elements. There are two kinds of each tool, free and premium.
The free ones normally have basic functions and features, the premium ones come with advanced features.
I suggest to try the free ones first. If you're getting serious at what you're doing, then it is okay to purchase the premium.
Where to Find?
The WordPress Repositoryhas them all, whether it's themeor pluginor both.
Recommendations
If you're to build a travel blog, I recommend these themes:
Lovecraft, Radcliffe, Hoffman, and Garfunkel by Anders Noren, Hueman, Author, AccessPress Mag, Sparkling, etc. You have thousands more themes to choose from here.
About the plugins, these are what I highly recommend:
- Jetpack: built by the WordPress team, bundled with extraordinary features to enhance the core functions inside your WordPress blog.
Several of them: custom CSS box, tiled gallery, website verifications, site monitor, social media comment, and other features that are previously added into WordPress.com blogs. - Yoast SEO: An amazing and complete SEO plugin to enhance your blog's search ranking. For my fellow Indonesian bloggers, you can read my complete guide to set up Yoast SEO plugin.
- Akismet: This plugin will be automatically enabled from the beginning when you install WordPress. Akismet will block spam from your blog.
- W3 Total Cache: This plugin helps you to boost your blog's performance, especially loading speed, so readers won't be tired of waiting. Read my complete guide to set up W3 Total Cache(Bahasa Indonesia only).
- Wp SmushIt: This plugin will compress your images to speed up your loading speed. Since you're gonna fill your travel blog with photos, this plugin is a-must have for you.
- Don't use too many plugins! Use ones that you really need. Plugins will make your hosting server running slow than in its normal state.
3. Outline is Savior!
Like any kind of writings, outline is a savior! You'd better make your outline of what topic/content you're gonna fill into your blog.
It's even better to write at least 10-20 articles with minimum 500 words before creating a WordPress blog.
Prepare the list of contents, theme, plugins, photos, and any other ideas that you don't want to lose in the time you're building your travel blog.
It's also great if you make an outline for your blogging strategy, especially profit-related blogging activity.
4. Install WordPress right inside your hosting's cPanel
If you already have a hosting to host your domain and WordPress blog including all the contents, then let's install WordPress right inside your hosting's cPanel.
First step you need to do is to make sure that you have pointed your domain name with hosting.
If you bought the hosting and domain from the same package or provider, then they'd likely already be integrated. If you bought from two from different providers, then follow these steps:
Note:These screenshots are taken from Idhostinger's cPanel and Namecheap's Domain Panel.
How to Integrate/Pointing Hosting with Domain
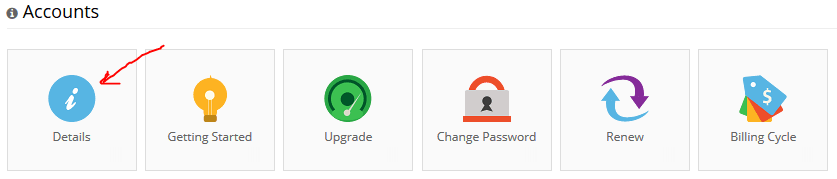
1. Login into your hosting account. After that you'll be redirected into your hosting's cPanel. Find something like Account Infoor Detailsor something like that, in my case, it's Details.
2. Then, find Nameserverslabel like this screenshot:
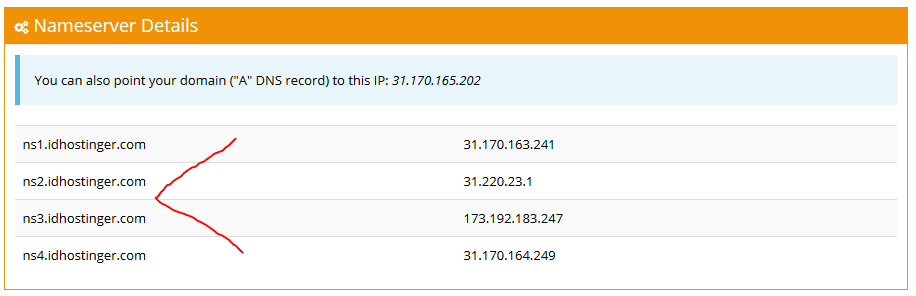
Usually there are 4 nameservers which labeled like ns1.idhostinger.com etc. After locating the nameserver details, leave the window open for now and move to the next step.
3. Login into your domain account from which you purchase your domain name. Then choose your domain and find something related with Name Server setuplike this:

Select that option. You should see something like this:
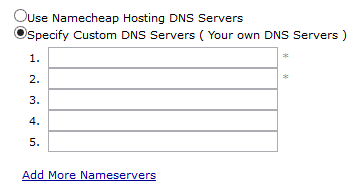
Then go back to the hosting account you left open before and copy-paste the nameservers into each of the domain's nameserver box. Save changes when you're done.
4. It normally takes 12 to 48 hours to have them being integrated. For some cases, domain and hosting will be integrated instantly. Sip some tea while waiting the integration process.
5. After the process succeed, go into your cPanel again and make sure no alert like "Your domain is not pointing to our nameservers at the moment..." you find in there.
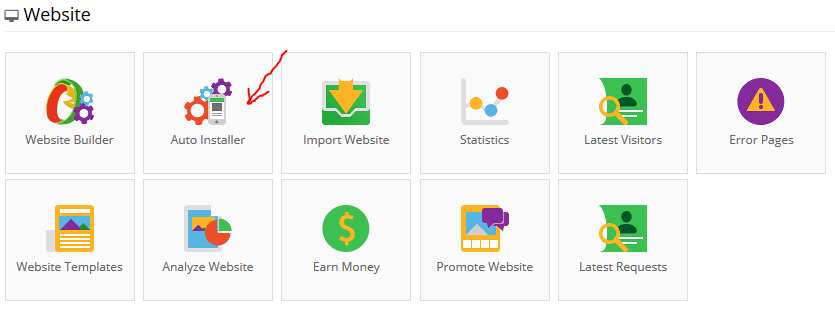
6. Choose the pointed domain name from your hosting's cPanel. Or inside the cPanel, find something like Auto-Installer, WordPress, 1-Click Script, CMS Script, etc then click it.
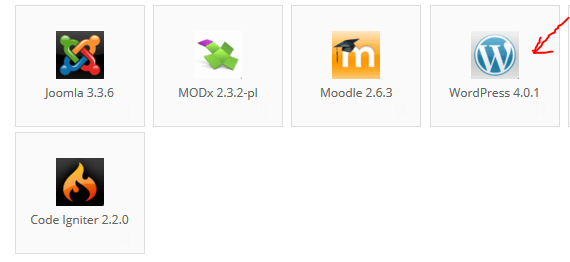
 7. Choose Content Management (CMS) WordPress (WordPress.org) from the available options. New window will be open.
 8. Choose the domain name in where you're gonna install WordPress. Fill the details then click Install.
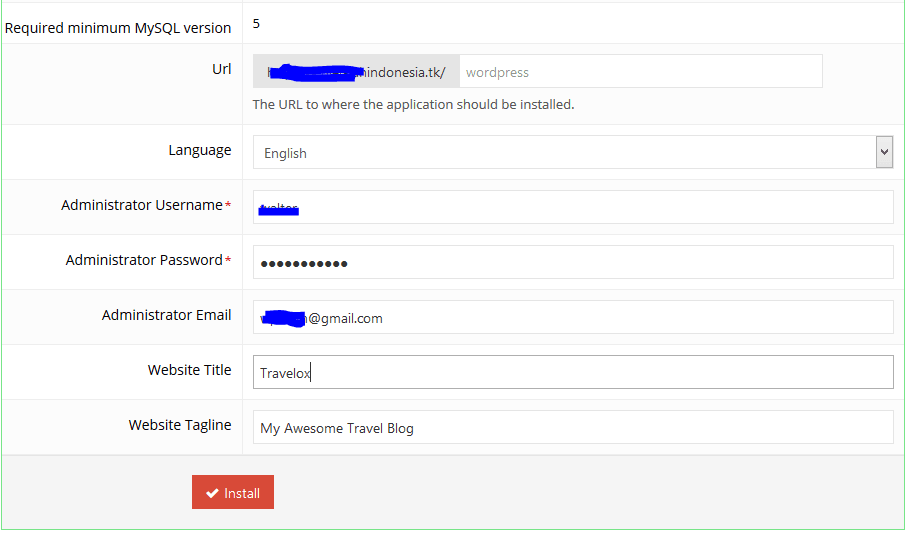 Details:
URL:the domain URL in where you're gonna install WordPress. Leave the last box empty as it is.
Language:Choose your preferred language.
Administrator Username:Use to login into your WordPress blog's Dashboard (yourdomain.com/wp-login.php). Note that the username cannot be changed unless you re-install WordPress, so choose it wisely.
Administrator Password:The password to login into the Dashboard.
Website Title:Your awesome travel blog title, make it fit with your domain. This can be changed later.
Website Tagline:Can be filled or changed later.
9. After clicking the Installbutton, the installation process will take place. Wait a few moments. After it's finished, click your domain name to see how your brand new WordPress blog looks like.
Your hosting provider will also send you an email regarding your WordPress details: username & password, website details, and login URL.
10. Congratulations on building your first WordPress blog, especially your travel blog! You can now login into your WordPress admin area by hovering to yourdomain.com/wp-login.php.

That's it! You now have full control over your own travel blog. Find resources as much as you can to customize your brand new WordPress blog. You can start posting articles and publish it immediately.
The next article will be about the WordPress set up. I'm gonna lecturetell you the elements you need to use and customize to make your travel blog as outstanding as you can imagine.
Wrapping Up
Now you have a WordPress blog for your travel stories with catchy and remarkable domain name. Choosing WordPress as main blogging platform is undeniable perfect decision for everyone who wants to start blogging, especially building a travel blog.
WordPress as main blogging platform is really easy to use, set up, and customize. You'll be satisfied once you get used to using WordPress as your main blogging platform.
So my final words, keep using WordPress to tell your travel experiences! Happy blogging!

Blogspot is owned by Google so in various ways it could overcome WordPress.
Yet WordPress is very flexible and really easy to configure so you can easily optimize your WordPress-based web.
Not to mention, there are free tools to help you boost your webpage's SEO.
WordPress Rules!